 Jumper’s knee is a stubborn knee injury that can take months to heal and even once it has healed, the pain might reappear after you return to your sport.
The jumper’s knee treatment triangle will help you solve this problem by fixing the three most critical causes for jumper’s knee.
In this article I will walk you through everything in detail. Keep reading to find out.
End Jumper’s Knee Once and For All
Back when I suffered from patellar tendonitis, I was so frustrated with my lack of healing progress that I often considered quitting my sports, basketball and volleyball, altogether. Stretching, warming up thoroughly, quad strengthening exercises, knee sleeves, no matter what I tried, the pain always kept coming back.
Today, my knees are stronger than ever. I can do extremely demanding leg exercises, such as deep single-leg squats, without any problems. I can play my favorite sports without having to worry about aching knees and I know how I can train my legs to become even stronger without risking a return of the injury.
It took me years of research into knee health and a lot of self-experimentation until I finally discovered the reasons for my jumper’s knee. Up to that point, I had completely ignored these hidden factors, but once I addressed them, my pain slowly disappeared.
In this article, I will show you the three most important secrets to successfully treating patellar tendonitis. I’ve called this the jumper’s knee treatment triangle, because if you ignore one of its parts, the whole thing collapses. You’ll also learn an exercise with which you can heal your patellar tendons.
What Is the Jumper’s Knee Treatment Triangle?
The treatment triangle will help you address the three most common causes for patellar tendonitis. I came up with the idea for the triangle during the research for my book Beating Patellar Tendonitis and while I deal with many other causes of this knee injury in the book, the three causes addressed with the treatment triangle are the most important.
The triangle provides the foundation for a successful recovery from jumper’s knee. If you want to make sure you stay pain-free in the future, this is where you need to start. Here’s what the triangle looks like:

Let’s talk about why its parts are important for healing this stubborn knee injury and determine how you can take care of them.
3 Hidden Causes for Patellar Tendonitis
Three major causes for jumper’s knee are low ankle mobility, low gluteal strength (hip strength), and bad leg alignment during athletic activity.
Unfortunately, these hidden causes are commonly ignored by athletes, trainers, and physical therapists, which is why the injury will reappear eventually after it has seemingly healed.
As you will see, all three of these causes are connected, which is why you need to address all of them if you want to make healing progress.
Additionally, they all have strong research supporting their importance for preventing jumper’s knee. For these reasons, the exercises introduced in the following paragraphs need to become a staple in your training regimen.
Cause #1: Low Ankle Mobility
Ankle mobility encompasses a number of ankle movements, but the most important one for our goal is dorsiflexion. Low ankle dorsiflexion range of motion has been linked to patellar tendonitis in a number of research studies, for example (Malliaras et al. 2006) and (Backman, Danielson 2011).
So what is ankle dorsiflexion?
You dorsiflex your ankle when you pull your foot up towards your knee or when you bring your knee out in front of your toes, with your foot planted. The opposite movement, plantarflexion, occurs when you point your foot away from your knee or when you push yourself up to stand on the balls of your feet.

There are two major reasons why low ankle mobility will lead to knee issues. First, if you lack ankle mobility, the body will compensate for it by increasing mobility at the neighboring joint, the knee. This increased demand of mobility will slowly overload the knee, which in time leads to pain and injury.
Secondly, if ankle mobility is low, you will have a difficult time maintaining good alignment of your leg. This is how ankle mobility is connected with the third major cause for jumper’s knee (Cause #3 leg alignment).
As you can see, the evidence supporting the importance of ankle mobility for healing the patellar tendon is strong, but how do we improve it?
How to improve ankle mobility
There are numerous ankle mobility exercises to choose from, but if you want to improve ankle dorsiflexion, the following drill will provide good results and direct feedback on your progress. Additionally, you don’t need any equipment to do it, which means you can do it anywhere.
All you need to improve your ankle dorsiflexion is a piece of furniture, a wall, or another vertical structure. Place one foot perpendicular to the object and the other foot a little more than shoulder width behind it. Now try to touch the knee of the front leg to the object by bringing it over the toes.
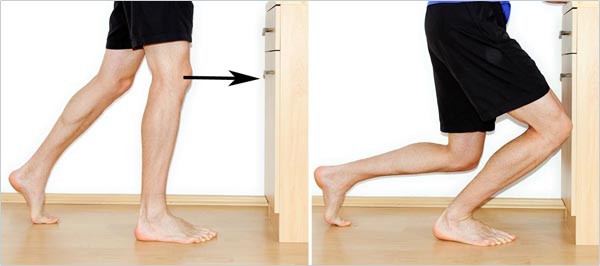
In ankle mobility drills, you might not feel a stretch. The goal is to move the joint through its full pain-free range of motion gently. By doing this you slowly increase the range of motion of the joint.
The important point is to bring the knee forward on the outside of your big toe (if you’re working your right foot, bring your knee forward and then to the right).
Have your knee tracking somewhere over the second, third, or fourth toe. Don’t bring the knee towards the inside of your foot and don’t turn your foot out, as this would lead to the arch in the foot collapsing.
If you could touch the object, move your foot back a little more. Once you can barely touch the object, switch sides by placing the other foot at the same distance. Now, perform the same test.
Asymmetry Between Sides
Is it easier for you to touch the object with one side? If so, you’ve discovered an asymmetry between sides, which you need to correct as quickly as possible by improving the mobility of the weaker side.
You will slowly improve ankle mobility by doing this drill once or twice daily. Do at least 15 repetitions per foot in each session. You’ll know when your mobility has improved, as you’ll be able to move the foot farther away from the object.
When we talk about cause #3 we will come back to ankle mobility and examine more reasons why it is so important for a healthy patellar tendon. For now, let’s talk about the second major cause for patellar tendonitis: low gluteal strength.
Cause #2: Low Gluteal Strength
Your glutes are the big strong muscles on your hip. These muscles are used when running, jumping, landing from a jump, and many other athletic movements.
The gluteal muscles also help you control the alignment of your knee during these movements. Therefore, if you have weak gluteal muscles, your legs are more likely to end up in a position in which you place excess load on your knees. Research has also uncovered low gluteal strength as a risk factor for patellar tendonitis (Ireland et al. 2003; Powers 2010), so let’s look into how you can make sure those muscles are strong.
How to improve gluteal strength
For a healthy patellar tendon, the three important movements your gluteals need to be strong in are hip abduction, hip external rotation, and hip extension. If you are strong in these movements, it will be easy for you to maintain good leg alignment in your sport. We will train these movements with the following three exercises.
Gluteal Exercise 1: Hip Abductions
To do hip abductions, lie down on your side with your body in a straight line. Put some padding under your hip if you’re on a hard surface. Now, lift the upper leg up, merely using the muscles of your hip. You should feel the contraction on the outside of your hip.

Keep your feet parallel to the ground, so don’t let them rotate outwards. If you let them rotate outwards (your foot points towards the ceiling instead of being parallel to the ground), other muscles of the leg will take over, and the exercise will be less effective, so pay attention to your technique.
Hold the elevated position for a second or two and contract the working muscles as hard as possible during that time. Lower your leg again. That’s one repetition.
Gluteal Exercise 2: Clamshells
To do clamshells, lie down on your side with your legs a bit in front of your body and your knees slightly bent. Put some padding under your hip if you’re exercising on a hard surface.
Now, rotate the upper leg out without moving your upper body or hip. Move by using the muscles on the outside of your hip.
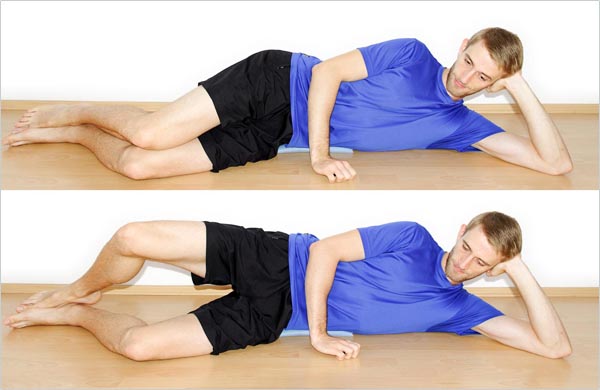
Pay attention to keeping your hip and upper body in one place during the exercise. Don’t compensate by turning your whole body over.
The movement might be very small in the beginning. As your muscles get stronger, your range of motion will improve. Lastly, don’t push off with your feet. The only muscles working should be the ones on your hip.
As with the other exercise, hold the elevated position for a second or two and contract the working muscles as much as possible. Lower your leg again. That’s one repetition.
Gluteal Exercise 3: The Glute Bridge
Lie down on your back with your knees bent. Move your heels closer to your body until your fingertips gently touch your heels. This is the starting position.
Now, pull your feet up into the air so that only your heels touch the ground and elevate your hip until there is a straight line through your knees, hip, back, and shoulders.
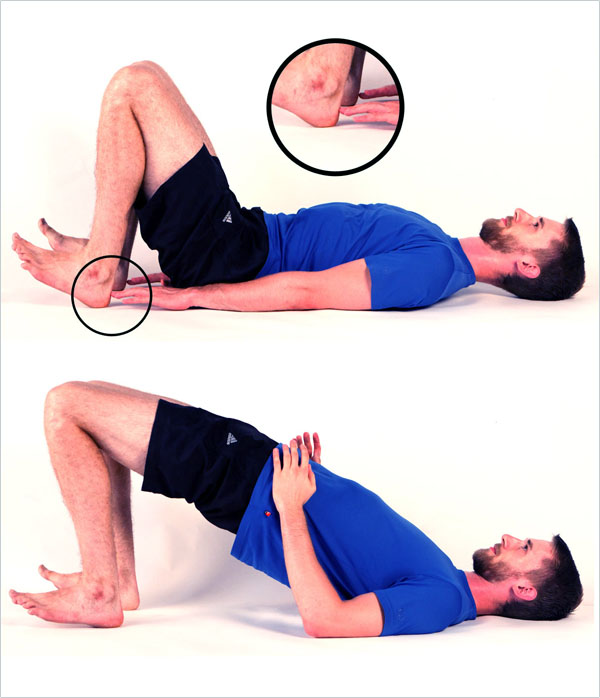
You should feel the contraction in your big buttocks muscles and not in your lower back or hamstrings. You can touch your hamstrings to make sure they’re not contracted as hard as your glutes.
Hold the elevated position for a second or two and contract your glutes as much as possible. Then lower down again. That’s one repetition.
Cause #3: Bad Leg Alignment
By working on cause #1 and #2, we’ve laid the foundation for fixing cause #3. To improve bad leg alignment, you need your gluteal muscles to be strong, so that they can successfully resist forces that are trying to push your knees into bad positions.

As you can see, we’re trying to avoid internal rotation and adduction. For this reason, we’ve trained gluteal muscles that create external rotation and abduction, the opposite movements.
Unfortunately, many people start and end in this position when they run, jump, or squat. This is problematic, as it puts undue load on your patellar tendon and on other passive stabilizing structures of your knee, such as the ACL.
Knees collapsing to the midline of the body are the main cause behind ACL-tears, especially among women. However, this faulty movement pattern will also overload your patellar tendon.
How Bad Leg Alignment Causes Jumper’s Knee
If your knee collapses inward when you move, the force transmitted through the patellar tendon will be off-axis and not parallel with the collagen fibers inside the tendon. It’s much like opening and closing a zipper by pulling it off to the side, instead of straight up and down.
It will slowly break down the zipper and you need to expend more energy to get it done because it’s less effective.
In your knee, the force pulling off-axis will slowly overload your collagen fibers. This overuse eventually results in jumper’s knee. Oh, and you’re wasting energy when you move that way, which means that if you learned to move properly, you’d be able to jump higher and run faster with the same amount of energy expended.
As you can see, it is critically important that you maintain good alignment of your legs during all of your training. Make sure your knees are tracking above the second, third or fourth toe and make sure your thigh is parallel to your foot whenever your knee is bent.
Avoid having your knee collapse to the inside of your foot and check for proper alignment during your training. Make corrections when necessary.
Alignment When Walking
A second alignment problem many people exhibit is walking with their feet turned out. The following picture illustrates that concept (left) and a more optimal foot alignment (right).
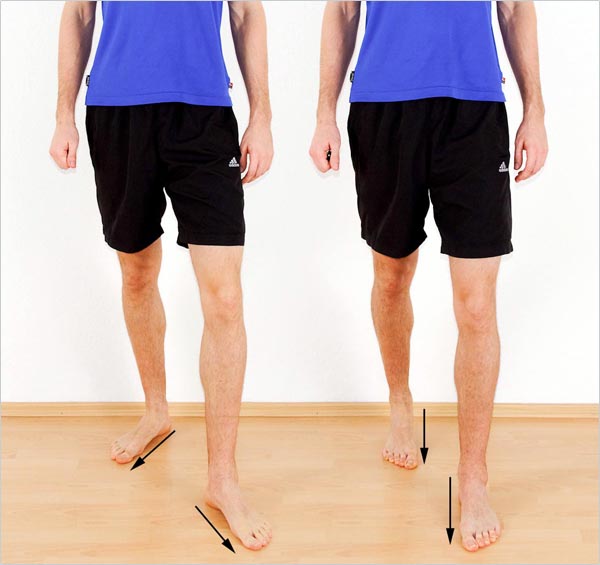
The next time you walk, look at your feet and their alignment. Are they pointing to the outside?
One of the reasons why people walk with their feet turned out is because they lack ankle mobility (cause #1!). The body compensates for this lack of ankle mobility by turning the feet out. If you repeat the drill under cause #1 with your feet turned out, you’ll notice that you seemingly have more range of motion. This is exactly what the body tries to accomplish by turning your feet out and to prevent this we need to work ankle mobility.
If your feet point to the outside, your knees are much more likely to collapse towards the inside of your foot, leading us back to the alignment problem explained earlier. Additionally, your arch will collapse a bit more, lowering your ability to transfer as much force into the ground as you could with a proper arch.
All these factors combined essentially lower your athletic potential and set you up for a number of injuries such as ACL tears, Achilles tears, and patellar tendon degeneration.
Don’t walk like a duck. Have your feet point forward.
The Next Step: Healing the Patellar Tendon
Once you’ve addressed each of the hidden causes, it’s time to help your patellar tendon heal faster. Depending on your situation, you can use two different methods to improve tendon healing through exercises. Let’s look at the basic idea behind these two healing methods.
Tendon Healing Method #1: Load Modification
If you’re still in the early stages of the injury, you can successfully help your patellar tendon heal by reducing the load it has to handle. You’re in this stage if you’ve only been experiencing the pain for a couple of weeks.
Reduce your weekly training load to a level at which the discomfort in your patellar tendon goes away. Stay at that level for a few weeks. Once you’ve done this, increase your weekly training load by 10%, until you’ve reached your previous level of activity. If your pain returns, you increased your training load too quickly.
The best exercises to perform during this phase are non-ballistic exercises (i.e., no jumping). Do slow weight training or even isometrics to help your tendon grow stronger. Stop all activities that lead to pain.
Tendon Healing Method #2: Eccentric Squats on a Slanted Board

If your pain has been there for a month or longer or if this isn’t the first time you’ve had jumpers knee, your injury has already progressed into one of the advanced injury stages. In this stage, you need to stimulate the cells inside your tendon to increase collagen synthesis again, so that your tendon can become stronger.
You can do this by utilizing different exercises, but the one with the most scientific evidence in support of its efficacy are eccentric squats on a slanted board.
To perform this exercise you need a slanted board (a 25-degree angle works best) and something to support part of your weight. You can improvise the slanted surface by standing on something elevated with your heels (wear shoes). In the picture, I’ve supported my weight by using a stick, but you could also place chairs next to the board for example.
Place more weight on the injured leg on the way down and lower yourself very slowly. Place as little weight as possible on the injured leg on the way up (shift your weight to the non-injured leg or your chair/stick/training partner).
I talk about the research that supports this exercise and the specific methods you can use to make sure you achieve optimal progress in my book. The important thing is that your pain slowly decreases from day to day, as you do this exercise. If your pain stays constant, you need to experiment with the repetition count and execution.
Avoid all unnecessary exercises that increase your pain if you’re in the advanced phase.
Putting It Together
You’ve now learned five very effective exercises that you can use to end your patellar tendonitis and to prevent it from returning. Start doing the exercises today and begin monitoring your pain, so that you can modify your activity level. Remember always to pay attention to your leg alignment. Download the following program overview for the treatment triangle to help you remember everything:

Your Next Steps
To help you get rid of your patellar tendonitis, I created a free course. I’ll also send you the two most important chapters of my book Beating Patellar Tendonitis as a gift. Sign up below to get started right away:
Citations
Backman, Ludvig J.; Danielson, Patrik (2011): Low range of ankle dorsiflexion predisposes for patellar tendinopathy in junior elite basketball players: a 1-year prospective study. In Am J Sports Med 39 (12), pp. 2626–2633. DOI: 10.1177/0363546511420552.
Ireland, Mary Lloyd; Willson, John D.; Ballantyne, Bryon T.; Davis, Irene McClay (2003): Hip strength in females with and without patellofemoral pain. In J Orthop Sports Phys Ther 33 (11), pp. 671–676.
Malliaras, Peter; Cook, Jillianne L.; Kent, Peter (2006): Reduced ankle dorsiflexion range may increase the risk of patellar tendon injury among volleyball players. In J Sci Med Sport 9 (4), pp. 304–309. DOI: 10.1016/j.jsams.2006.03.015.
Powers, Christopher M. (2010): The influence of abnormal hip mechanics on knee injury: a biomechanical perspective. In J Orthop Sports Phys Ther 40 (2), pp. 42–51. DOI: 10.2519/jospt.2010.3337.
Photo Credits
