The best knee strengthening exercises all in one place: build stronger legs at home in just 10 minutes per day.
On this page you’ll find the best knee strengthening exercises you can do at home.
I’ve divided this article into 3 lists: exercises for runners, exercises for athletes, and exercises for seniors. All of them are fantastic for building stronger muscles around the knee, as well as for knee rehab at home.
Also:
If you’re not sure where to start, try the example routines further down on this page.
Before continuing, read the full disclaimer here.
Before You Get Started
To stay safe, please do the following before you get started:
- If you have pain or suspect an injury, get diagnosed, treated, and cleared for exercise by a doctor.
- Don’t train through pain.
- For best results, start small and progress slowly.
Now let’s jump in. Click on the links below to get started.
Knee Strengthening Exercises for Runners
Running is a lot more fun if you can do whenever you want and without regrets. The following exercises can help you do that by strengthening the leg muscles you need to run fast and injury-free.
If you want to learn more about the scientific reasoning behind these recommendations check out this article. In essence, we will strengthen the knee by working on the ankle, the hip, the leg muscles, and the hip muscles.
Without this comprehensive approach results would be limited. I encourage you to also try the knee strengthening exercises for athletes further down on this page.
Banded Squat
The banded squat strengthens the muscles on the side of the hip to help your knee stay in healthy alignment over the foot even during longer runs. You can use this exercise as a warm-up by doing just a few repetitions or as part of your workout by doing 10+ reps.
To do the banded squat you need a very strong elastic band. I prefer using the stronger 9’’ Rogue Loop bands, although any other loop band will do as long as it is strong enough.
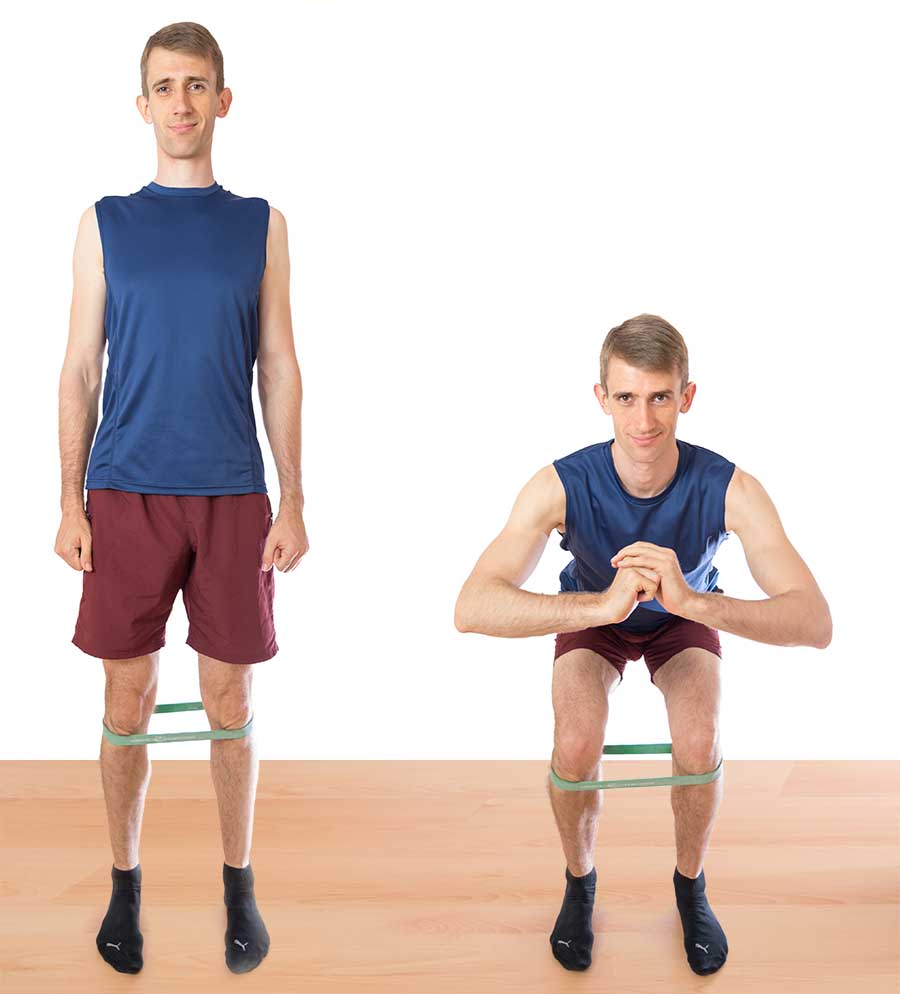
Stand with your feet about hip-width apart, parallel, and pointed forward. The band should already be under tension. Now squat back slowly and go as low as you can without pain or discomfort. Take about 5 seconds on the way down and 5 seconds on the way up.
Repeat for 5 to 15 repetitions. Stop as soon as your knees no longer point straight ahead or move towards the mid-line of the body.
Pictures: starting point from the front, mid-point from the side, mistake of knee moving inwards
Glute Bridge
The glute bridge exercise improves your hip extension strength, which will protect your lower back against injury, make you more explosive in sprints, and counters the effects of sitting.
Training the gluteal muscles also lowers your risk of suffering a running injury.
To do the basic glute bridge you lie down on your back with your heels touching your middle fingers. Now push through the heels, tensing your buttocks muscles, until there’s a straight line from your knees to your shoulders.
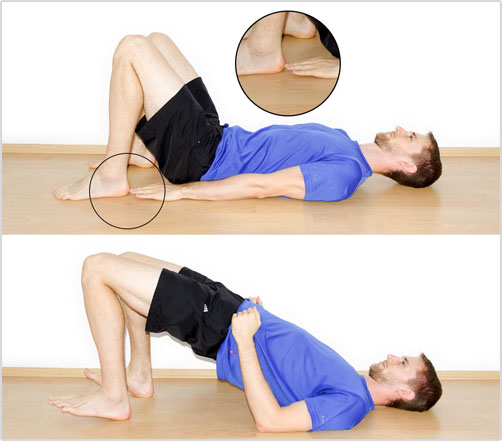
Keep both sides of your hip at the same height during this exercise and make sure you push up high enough.
Once the two-legged version is too easy you can switch to single-leg glute bridges. With this version it’s even more critical to keep the hip parallel to the ground.

You can place a stick on your hip to keep one hip from sagging or you can try touching the knee of the non-working leg to an imaginary object above you.
Go for 3 sets of 15 repetitions and pause for a second at the top of the movement.
Hip Flexor Training
If you sit a lot during your day your hip flexors may have become tight and weak. Tight hips contribute to a myriad of problems including knee pain and back pain. They also make you run slower.
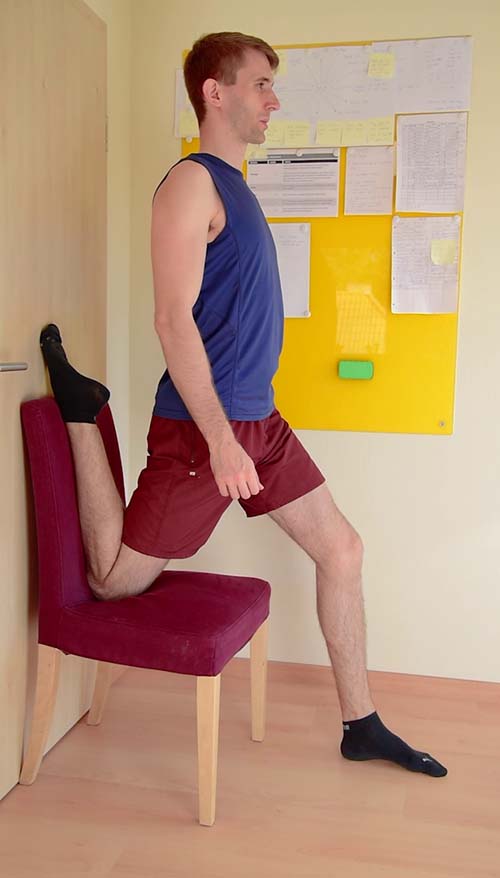
To fix tight hips we need to stretch and strengthen the hips. We can strengthen them by doing hip flexor holds against a wall:
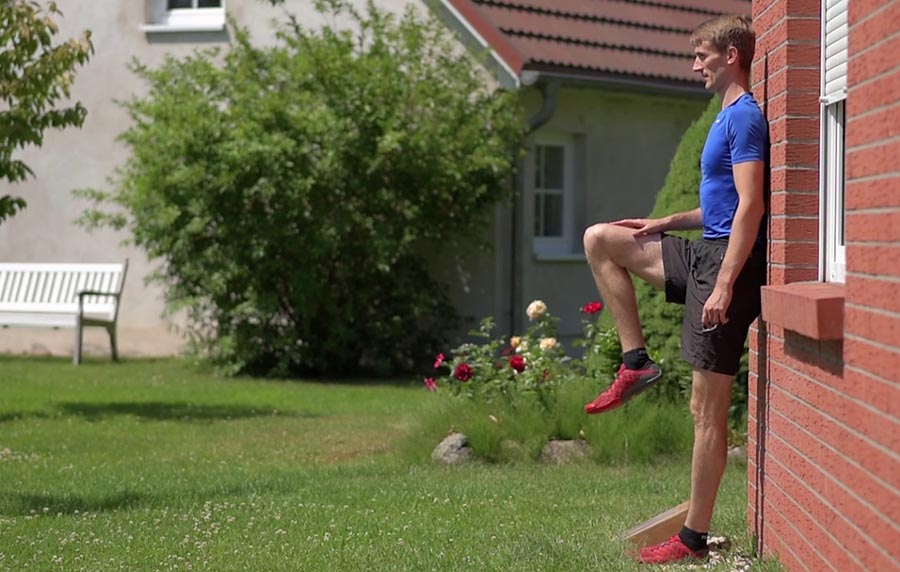
Hold this position for 60 seconds. This is a very basic test of hip flexor strength. If you cannot do this you shouldn’t be running.
To load the hip flexor with heavier resistance you can attach weight plates to your shoe with a strap and exercise while standing on a box or bench. Go for 3 sets of 12 reps with a weight that’s heavy but still doable.
Hip Flexor Stretch
You can’t have strong knees without strong and healthy hips. Restoring normal tissue extensibility to the hip flexors is an important part of this, which is where the hip flexor stretch comes in.
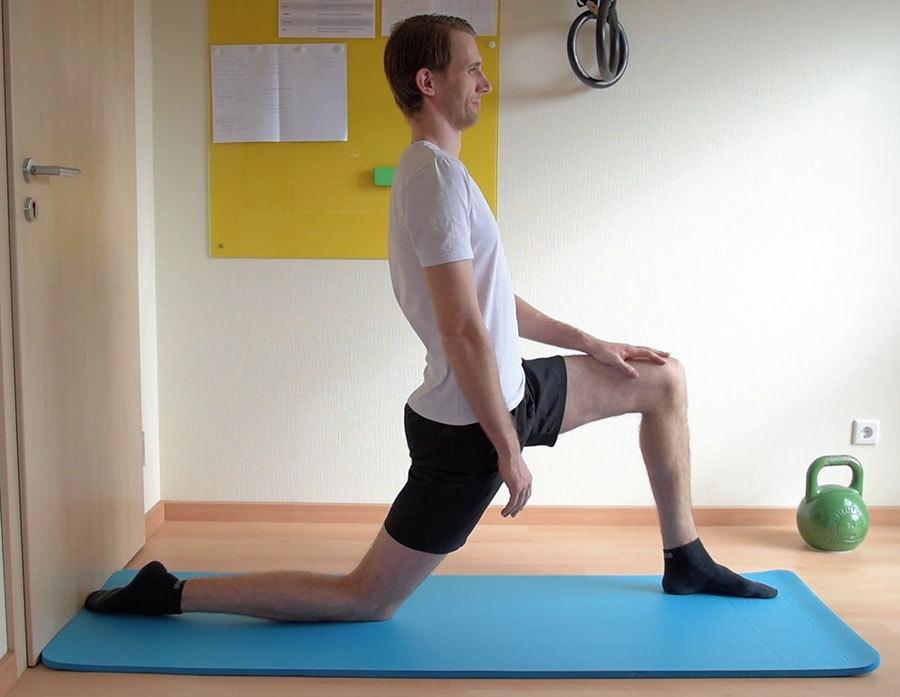
Go into a lunge position with your front knee aligned over your toes. Now brace your abs and tense up your buttocks muscles. Next you push the rear heel backwards until you can feel a stretch in front of your hip.
Let gravity help you sink deeper into the stretch, but keep your spine neutral throughout. You don’t want an excessive curve in your lower back.
It’s best to practice this stretch with stick behind your back to get the hang of it. Keep it in contact with your tailbone, upper back, and head:
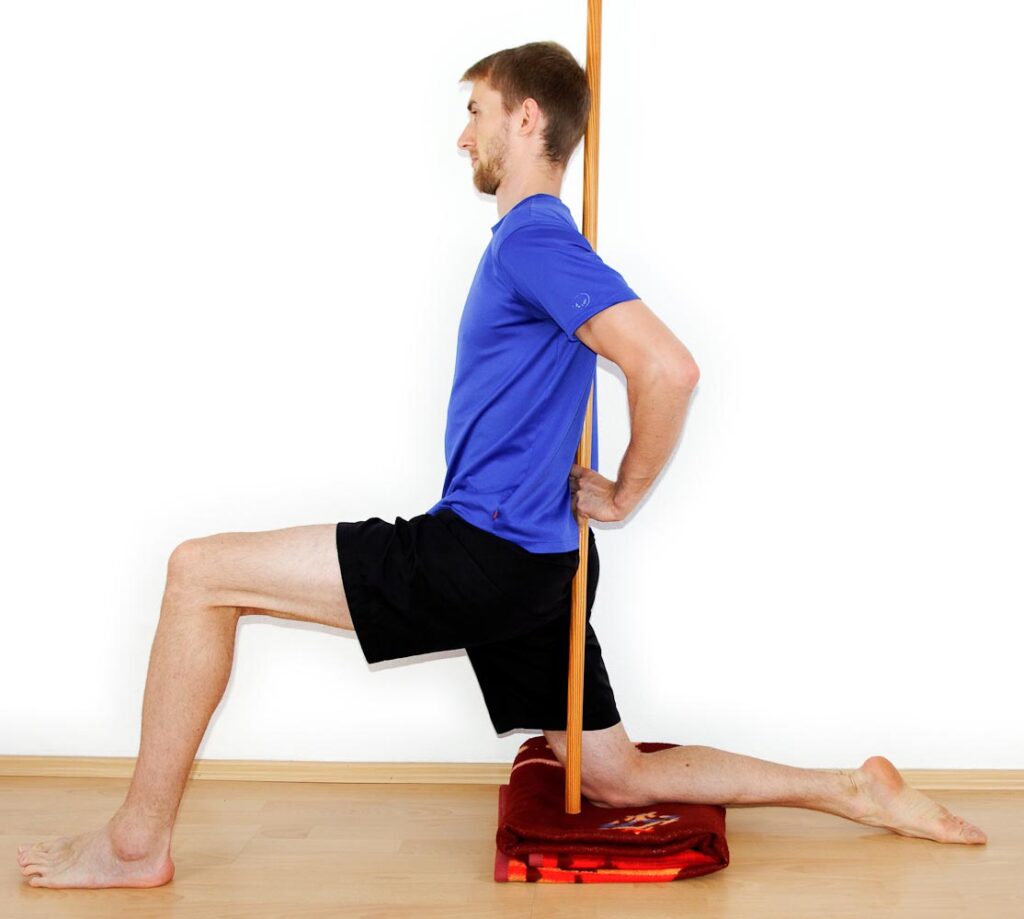
Keep just enough space in the lower back region so that you can slide a couple of fingers through.
Clamshell
The clamshell is a very basic exercise to help get the hip muscles working properly again. It specifically targets the gluteus medius muscle: a crucial muscle for protecting your knees during longer runs and for preventing ACL-injuries.
To do the clamshell you lie down on your side with your legs slightly in front of you and knees bent. Tilt the top of the hip forward a bit. Just imagine there’s a glass of water on your hip that you want to spill on front of your body.
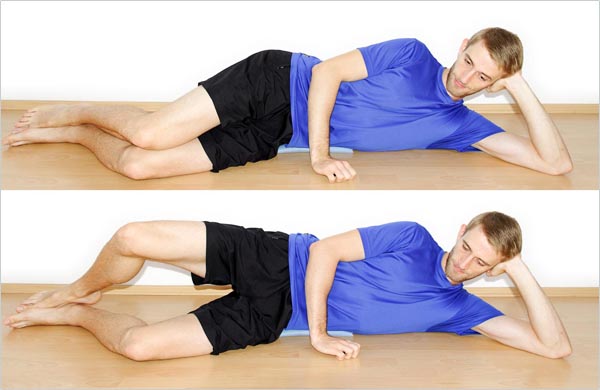
If you can, go into a little bit of posterior pelvic tilt by pulling your pubic bone up towards your belly. This makes the exercise more effective. Your lower back will get flat or push out a bit during this.
Once you’re in the starting position you rotate the upper leg up by moving solely from the hip. Do not push with your feet. You should feel this in your hip and not your thighs.
The movement should be small. If you have large range of motion you’re likely doing it wrong.
Go for 3 sets of 15 reps per side. Once you’ve got the hang of it you can make the exercise harder by using an elastic band or you can save some time by doing the banded squat instead.
Samurai Sit
The main purpose of the samurai sit is to improve the mobility of the big toe. Limited mobility of the big toe contributes to injuries such as plantar fasciitis and Achilles tendonitis. It can also cause issues further up-stream: the knee.
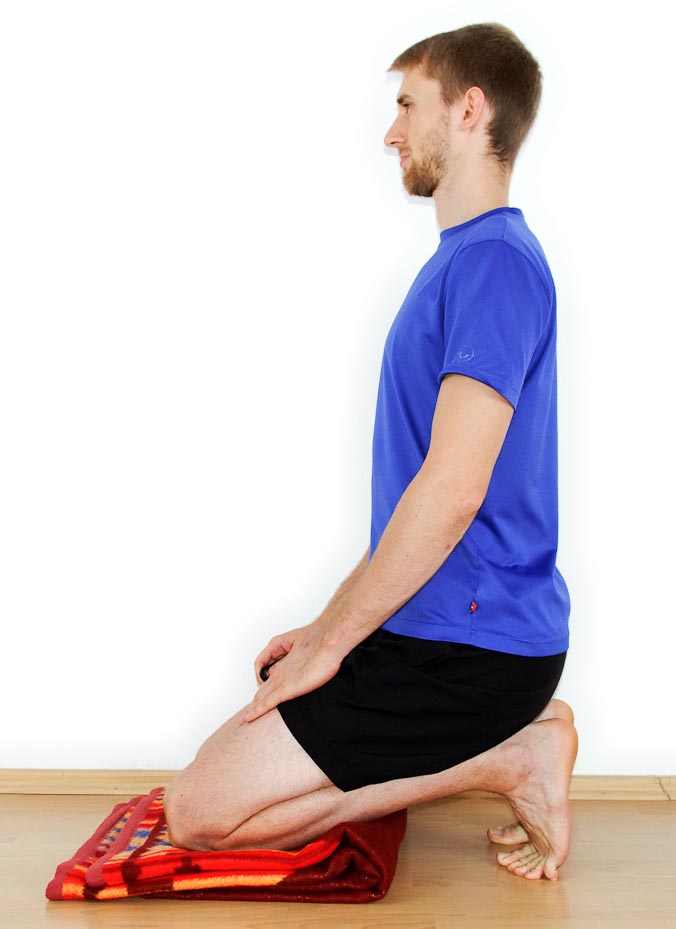
To do the samurai sit you kneel down on a soft surface with your knees together and your heels underneath your buttocks muscles. Do not let your heels splay out to the side, as this makes the exercise less effective.
If you cannot sit back on your heels, you can place a pillow on your heels or hold on to them with your hands-
Hip Abductions
Hip abductions are another very basic knee strengthening exercise for runners. Like the other hip exercises mentioned earlier this also protects against running injuries as well as ACL-tears.
To do hip abductions you lie down on your side with your body in a straight line. Tilt the top of the hip forward. Imagine there’s a glass of water sitting on your hip and you’re trying to spill it to the front of your body.
Tuck your hip under by pulling your pubic bone up towards your belly if you can (slight posterior pelvic tilt).

Now you lift the upper leg up by using the hip muscles. Keep your hip tilted forward and lead the exercise with the heel. The heel should be the highest part of your foot throughout the movement.
Go for 3 sets of 15 repetitions. Once this has become easy you can do the elevated version:
With the elevated hip abduction you need to pull your shoulder away from your ears. Don’t let the shoulder of the supporting arm hike up towards your ear, as this could cause shoulder issues.
Adductor Bridge
The adductor bridge can reveal side-to-side imbalances of the muscles on the inner side of the legs. Weakness in these muscles can contribute to injuries such as hamstring tendinopathy.
To do the adductor bridge you need a chair or a bench. Lie down in front of the chair with your feet underneath the chair.
Now place the inner side of the top foot on the chair. Next you go up on your elbow, again protecting your shoulder by pulling it away from the ear. Then you raise your hip up until there’s a straight line from your foot through your hip to your shoulder.
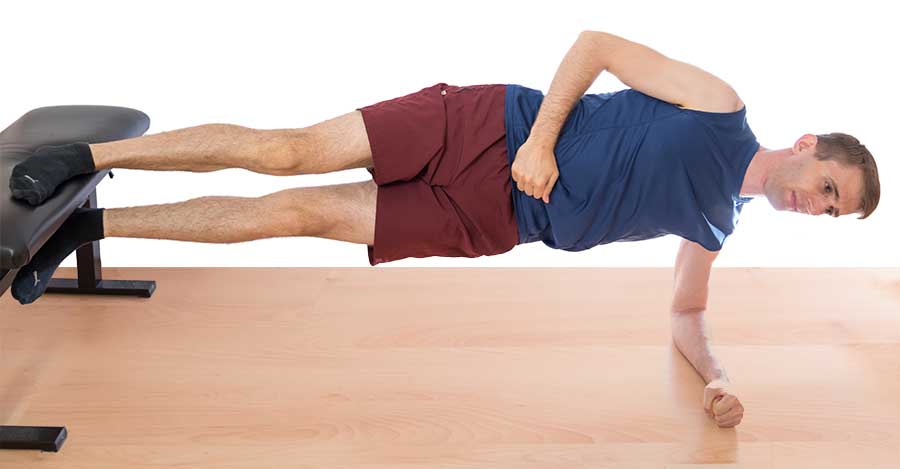
Tuck your hip under during this exercise by trying to pull your pubic bone up to your belly (i.e., posterior pelvic tilt). If you have difficulty with this movement, practice it while lying on the ground before attempting the adductor bridge.
Once you’re in position for this knee strengthening exercise you hold for 30 – 60 seconds. Then repeat with the other side. Note whether there are big strength differences between sides and work to correct them.
Prone Leg Raises
The main purpose of this exercise is to practice proper core activation. Without good core activation body alignment during running will degrade quickly, leading to excessive load on the joints and slower running times.
Prone leg raises also train the hip flexors a little bit and can improve hamstring extensibility somewhat.
To do this knee strength exercise you lie down on your back with your body in a straight line. Lift both legs up with the knees straight. Keep your lower back flat against the ground so there’s no space between your lumbar spine and the floor.
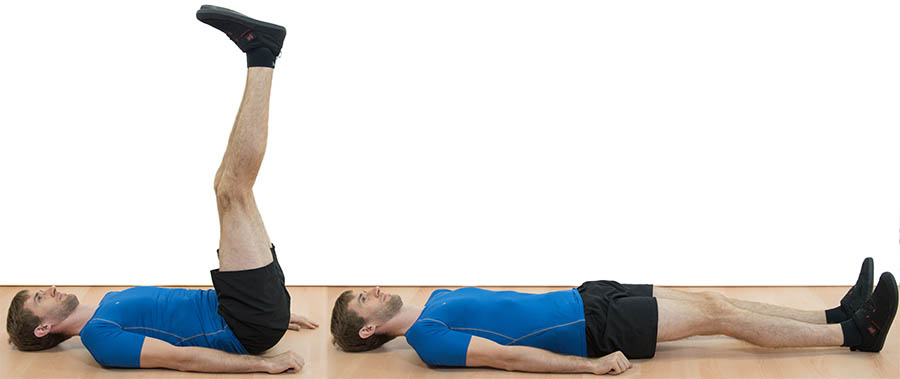
Now you slowly lower your legs again until you begin to lose contact between your lower back and the ground. At that point you reverse the movement. The goal is to be able to touch your heels to the ground without your lower back losing contact.
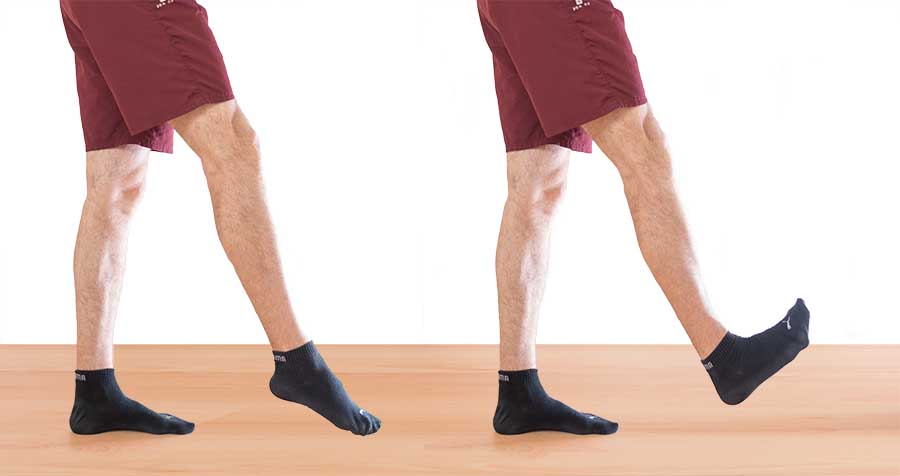
Ankle Rotations
This neat little exercise will protect your knees by keeping your ankles flexible. You can do this while sitting, standing, or even lying in bed. The latter will allow you to work both ankles at the same time, which is why I sometimes do this before going to sleep.
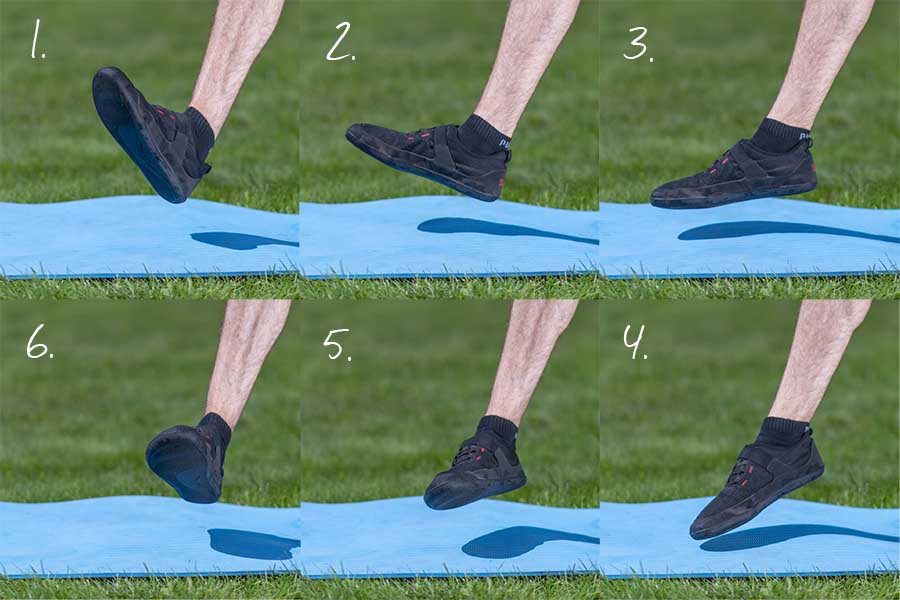
To do ankle rotations you draw a circle with your heel. Try to make the circle bigger with each repetition. This makes the exercise more effective as opposed to just moving the foot around.
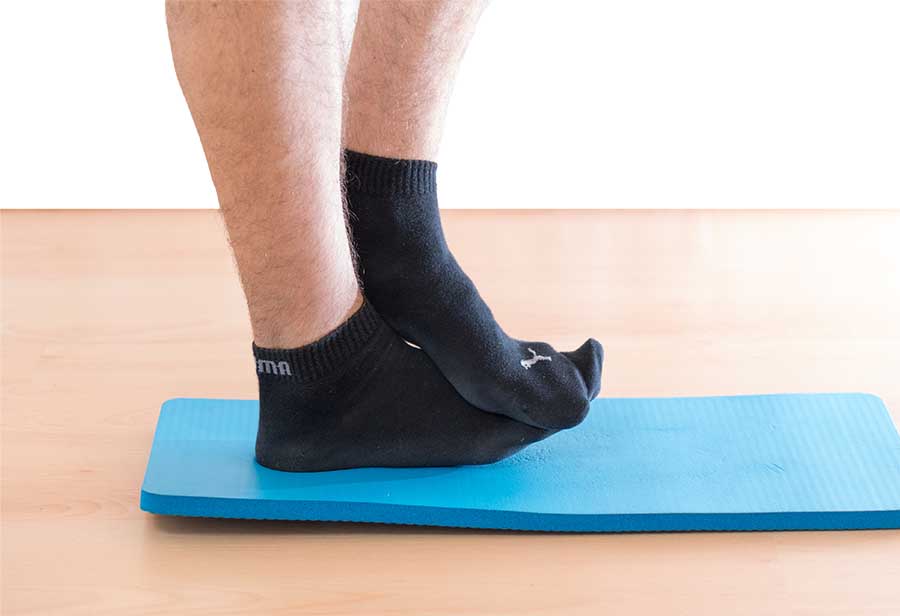
Ankle Dorsiflexion Strength
The muscle on the front of the shin – the Tibialis anterior muscle – is overlooked in most strengthening routines for runners.
Training this muscle will reduce your risk of suffering shin splints and improve ankle dorsiflexion. Healthy ankle dorsiflexion is another piece of the puzzle for strong and healthy knees.
You have several options to strengthen the Tibialis anterior:
- You can pull the front of your foot up towards your shins for a high number of repetitions (50 – 100).
- You can pull against an elastic band.
- You can place a heavy weight on your foot and lift it (use some padding).
- Or you can use a special contraption to strap a dumbbell to your foot. At $150 dollars it’s too expensive for my taste though.
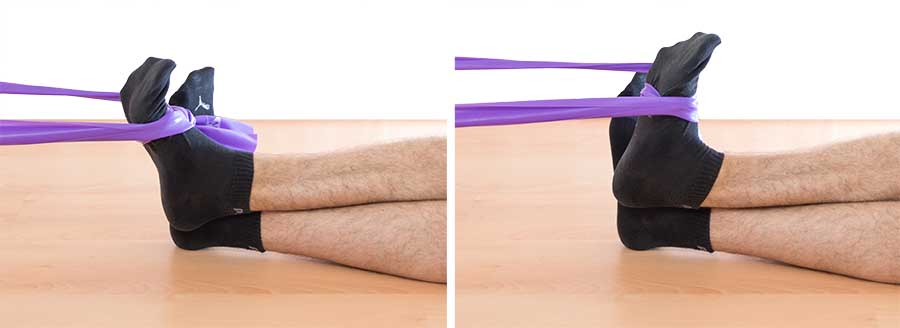
My preferred way of training the Tibialis anterior muscle is by doing very high reps of the ankle rotation exercise mentioned above. I try to pull the front of my foot up as high as I can during the rotations. After 100 – 200 repetitions there’s usually a nice burn in the muscle.
I can rarely fall asleep right away, so I sometimes do those 200 reps in bed with my feet hanging out. I do both ankles at the same time and do 100 reps in each direction. It doesn’t take more than 4 minutes.
Knee Strengthening Exercises for Athletes
The following knee exercises for athletes are advanced drills. If you don’t feel safe doing them I recommend you start with the exercises for runners above. Using those you can build a good foundation for the more advanced drills.
If you’re unsure how to put the exercises together into a routine, check out the example routines at the end of this page.
I’ve ordered this list from easiest to hardest to give you an idea how these exercise roughly compare to each other.
Calf Raises
Strong calves are essential for healthy knees. The easiest way to train calves is with single-leg calf raises while standing on small object. You can use a piece of wood, a thick book you no longer need, or a stack of weight plates.
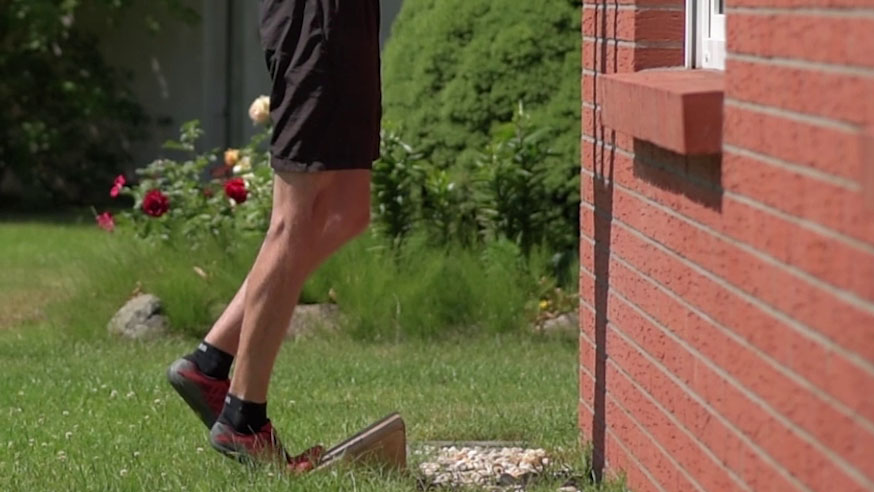
Stand with your foot pointed forward and let your heel sink down. Hold on to something for balance but try not to pull yourself up with your hands. Now push up until your ankle is fully extended. Sink down and repeat.
Aim for 3 sets of 15 repetitions. Once that’s easy you can begin using additional weight.
Reverse Lunge
The reverse lunge is easier on the knee than the regular lunge, which makes it a great knee strengthening exercises for athletes. It primarily targets the quads and gluteal muscles.
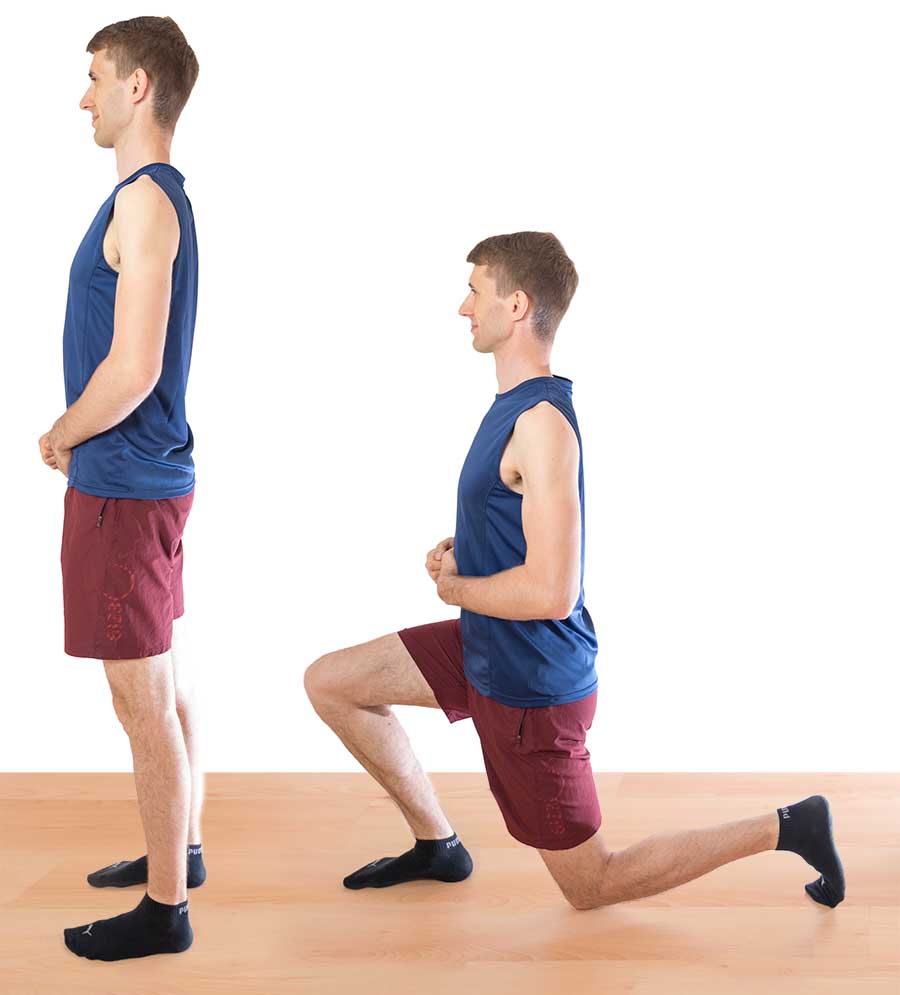
Start with your feet underneath your hips and pointed forward. Step back with one foot while keeping your torso upright and spine neutral. Brace your core and your gluteal muscles to control hip movement.
How far you can step back is largely determined by the extensibility of your quads and hip flexors. Use low weight until you’ve figured the movement out and then build up slowly.
Hip Thrust
The hip thrust is a fantastic exercise to build stronger gluteal muscles, which will make you run faster and jump higher. Healthy gluteal muscles are also critical to protect your knees against injury.
The main drawback of the hip thrust is that it’s difficult to set up. To do the barbell version you need a barbell, a low bench (ca. 15 inches high), a way to secure the bench against tipping over, and some padding for your hip. You can also do the exercise with your back on aerobic steps.
To start, sit down in front of the bench with your shoulder blades just above the bench. Place the barbell or weight on your hip. Make sure you use ample padding to prevent bruises. Your shins should be roughly vertical throughout the exercise.
Next you push up by driving through the heels. Push your knees out during the movement. Push up until you reach full hip extension. There should be a straight line from your shoulders through your hips to your knees.
Couch Stretch
The couch stretch is not a knee strengthening exercise per se, but it does help your knees stay strong indirectly.
This stretch improves muscle extensibility of the quadriceps and hip flexor muscles. The more flexible these muscles are, the more range of motion you can safely use in the lunging exercises.
To do the couch stretch you set up in front of a couch or easy chair, place your knee all the way into the back corner, and then push up. Keep your abs braced and put some tension in your buttocks muscle to maintain a neutral spine.
Go here for a video demo of the couch stretch. (Opens in a new tab)
One-Legged Deadlift
The OLDL is very much a Swiss army knife of a knee strengthening exercise because of its many benefits:
- Trains the hamstrings
- Strengthens the gluteal muscles
- Allows practicing good leg alignment
- Improves balance
- Strengthens lower leg muscles
- Improves hamstring extensibility
- Protects against ACL-injuries and ankle sprains
- Safe way to overload the hamstrings without risk to the lower back
- Ingrains hip hinge pattern for knee-friendly jumping
- You can use whatever weights you have
To the one-legged deadlift, stand with your feet hip-width apart and pointed forward. Now you lift one foot and hinge at the hip:
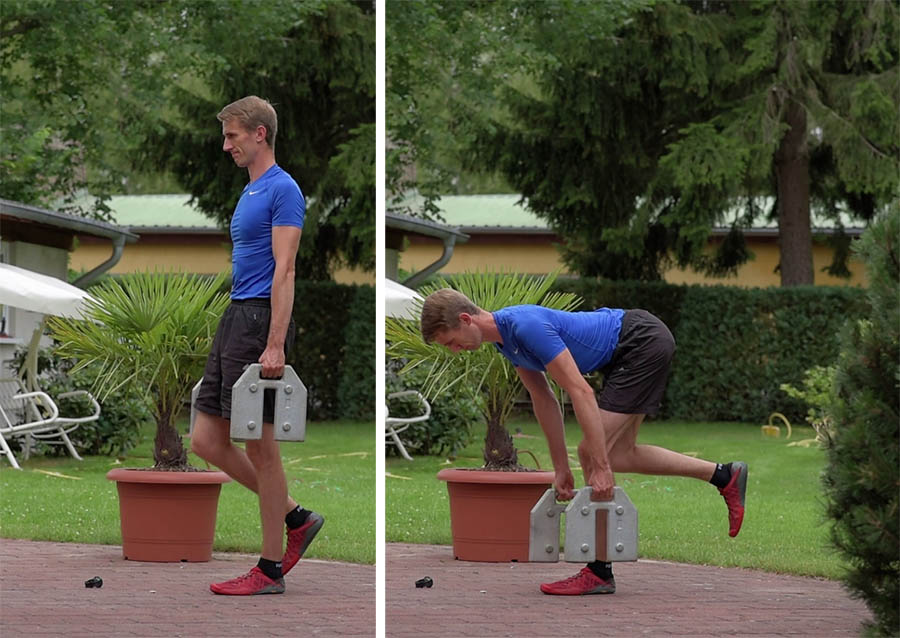
I prefer just bending the knee a little bit. Others do this exercise by extending the non-working leg in a straight line behind the body.
Keeping the foot near the ground makes it easier to catch yourself if necessary. I also think that keeping your legs underneath your body is closer to movements you’d actually do in sports.
Make sure you move at the hip and not the lower back. If you’re uncertain about this you can do the exercise with a stick behind your back:
Keep the foot of the working leg pointed forward and make sure the knee of that leg stays above your mid-foot. I recommend bending the knee of the supporting leg a little bit because that’s what naturally happens when you’re jumping or landing from a jump.
Be careful not to go too deep and don’t use too much weight in the beginning. I recommend starting with the bodyweight variation if you’ve never done this exercise.
ATG Split Squat
The ATG Split Squat was first popularized by the late Charles Poliquin. This is a fantastic knee strengthening exercise when you approach it with adequate respect.
The ATG Split Squat (ATG = ass-to-grass) allows you to safely strengthen the knee, ankle, and leg muscles in the end range of motion of both, the knee and the ankle. So you’re in full knee flexion and full dorsiflexion.
The ATGSS also stretches the hip flexors of the rear leg.
To do this exercise you stand in a split stance with both feet pointing forward. Now you move down diagonally until the calves and hamstrings of the front leg touch.
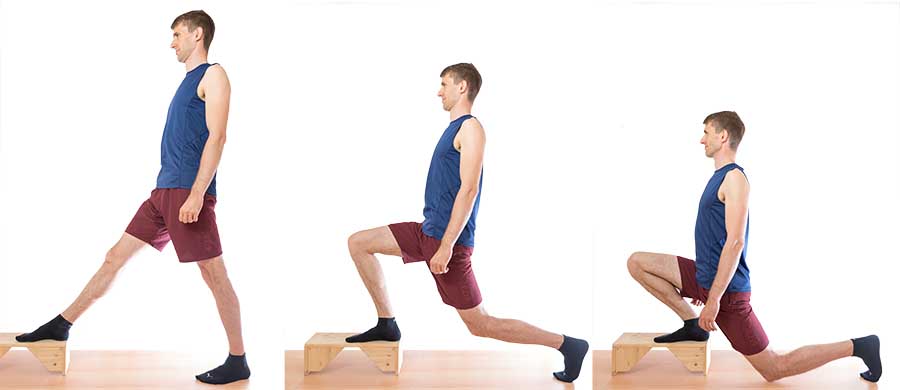
In the beginning you may have to place the front foot on a step to achieve full depth. Only work in the pain-free range of motion. Do not use weights until you can do full ROM in the bodyweight version.
Again: the ATG split squat is a diagonal movement and not an up-and-down movement.
King Deadlift
The King Deadlift is one of the most difficult bodyweight exercises for the knees and legs. Some also call this exercise “shrimp” or “air lunge”. The second one somewhat makes sense considering what it looks like:
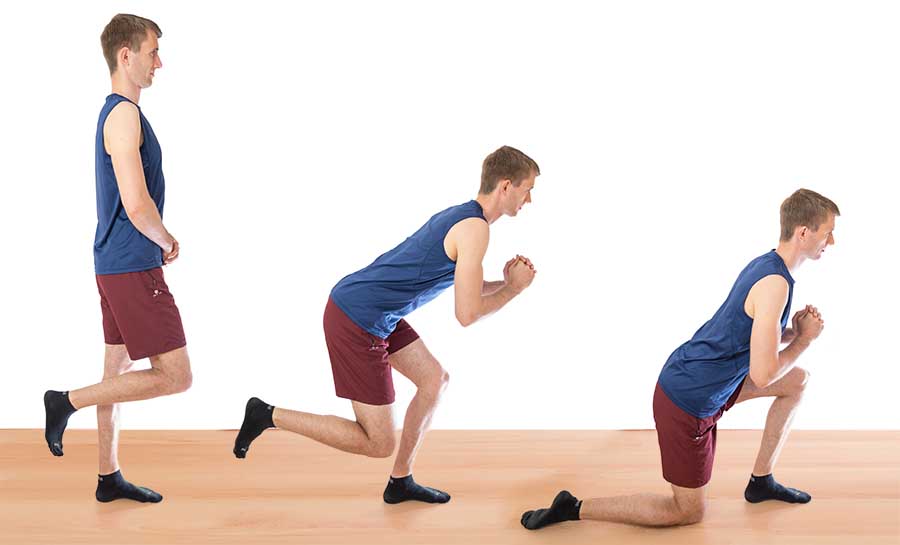
To do the King Deadlift you stand with your feet hip-width apart and pointed forward. Now you bend one knee and gently touch it to the ground behind you. Use some padding to make it more comfortable.
Be sure to keep the knee of the front foot aligned over the toes. You also want to maintain a nice arch in your foot.
If you’re having trouble with balance you can hold on to some light weights for counterbalance. In the beginning you can practice only the lowering part of the movement and then push up with both legs until you’re strong enough to the full version.
Single Leg Squat
The single-leg squat (aka “pistol squat”) is another very difficult bodyweight exercise for the legs. The main benefit is that you can strengthen your legs through the full range of motion of the knee without building excess leg muscles.
If you’ve never done a full ROM single-leg squat you need to be careful with this exercise. I recommend starting by practicing balance in the bottom position:
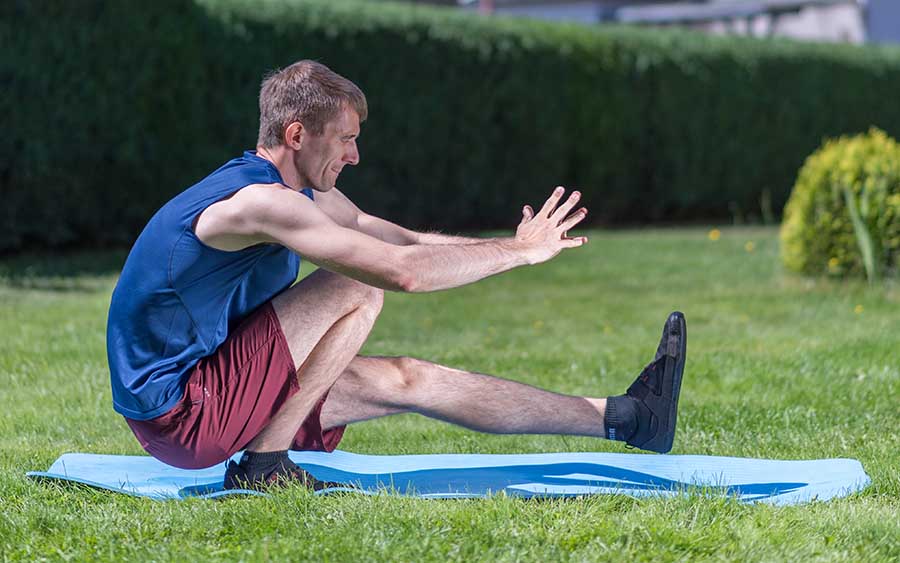
Hold this for 20 – 30 seconds per side and repeat with the other side. Do several sets of these holds. After a two or three weeks of practicing this every other day you will feel more secure in the bottom position.
Next you practice the slow eccentric version of the movement (= the lowering part).
Stand next to a wall or in front of an open door and squat down on one leg, but do it slowly. Take about 5 seconds on the way down. Finally, push up with both legs and repeat until your leg feels fatigued. Then do the other side.
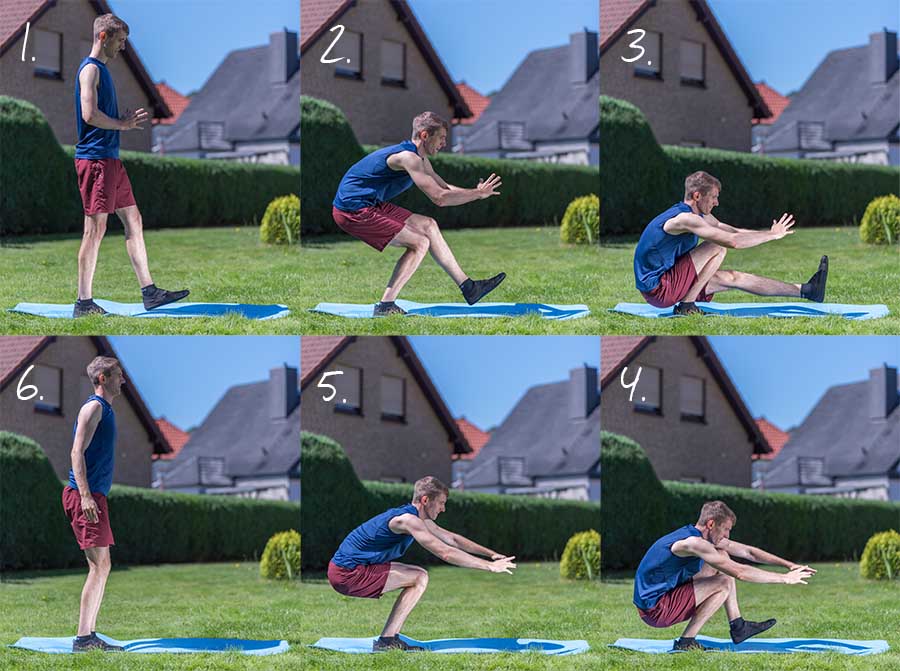
Once you feel very strong in the eccentric movement and can pause at any point, you can begin working on the concentric movement as well (= pushing up). Do a 3 second eccentric and then push up with one leg.

Repeat for a few reps, but stop before you’re fatigued. You want to avoid overstressing the knees with this, so scale it up slowly.
You can practice the single-leg squat every other day if you avoid fatigue. Your strength will build up quickly.
This is a very intense exercise and if you have a history of knee pain you need to approach this with a lot of discipline and respect. Do not let yourself get carried away, but stick to conservative increases.
If you’re having trouble with good leg alignment I recommend stretching the TFL, piriformis, and quad muscles. Foam-rolling the legs and hips can also help.
Knee Strengthening Exercises for Seniors
We can’t expect to be dunking basketballs at age 80, but being able to walk for an hour so you can enjoy a vacation or a trip around town should be possible. Here’s the problem.
With increasing age the body loses muscle and strength. Senses like body awareness and balance also get weaker. The result is a higher risk of falls, injuries, and a general loss of freedom.
The only way to prevent your body from becoming a prison is through exercise. It doesn’t matter when you start, because it’s never too late. And it’s never too early either. In fact, now is just the right time.
The following knee strengthening exercises for seniors will help you regain strength and mobility, will prevent injuries, and will allow you to enjoy an active life.
Amosov Squat
The Amosov squat will rebuild basic strength and endurance in the leg muscles. It’s also a gentle strengthening exercise for the knees, because it allows slow and controlled movement through the full range of motion.
To do the Amosov squat you need a strap with handles, a sling trainer, or something similar. Anchor the strap somewhere high, like in a door frame, and you’re ready to go.
Step back until your arms are almost completely straight. Keep your feet parallel, hip-width apart, and pointed forward. Now lean back until there’s tension in the strap.
Sit your hip back and try to touch the ground behind your body. You don’t want to sit straight down, but back:
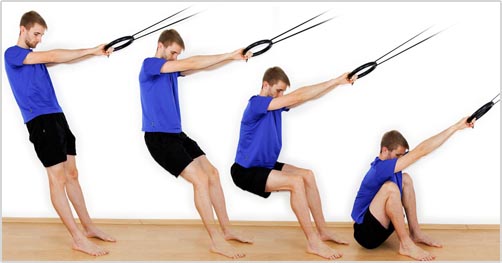
You can also improvise the Amosov squat on a door:

Only work in the pain-free range of motion. You can start with 20 – 30 repetitions, but work your way up to 100+ repetitions. Once you get stronger you can increase range of motion as your knees permit.
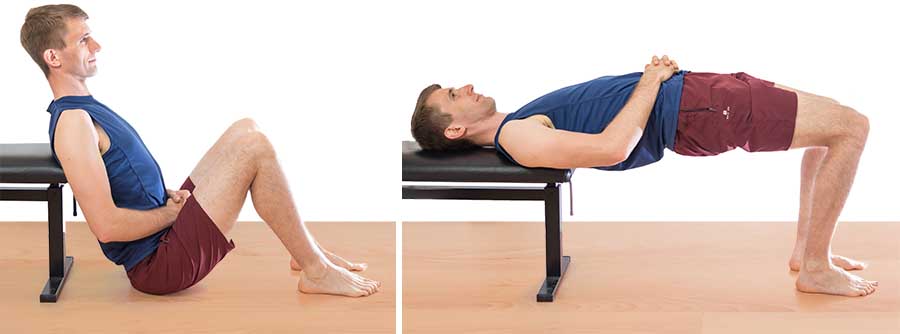
Two-Legged Glute Bridge
The two-legged glute bridge strengthens the buttocks muscles, which will protect your back and knees against injuries.
To do this exercise you lie down on the ground and slide both heels in until they’re touching your fingertips. Now you push your hip up until there’s a straight line from your knees to your shoulders.
Go for 3 sets of 15 repetitions and squeeze your buttocks muscles hard at the top. Push up as high as you can with each rep and if you get exhausted, just take a breather for a few seconds.
Balance Drill
The balance drill strengthens the stabilizing muscles in the hips and lower legs. It will help you prevent falls and ankle sprains.
Stand with your feet pointed forward and lift one foot up. Keep your arms stretched out to the side. Now balance on the one leg for 60 seconds. Repeat with the other side.
Once you can do 60 seconds without a problem you can try to balance with your arms in front of your chest (picture 2). Aim for 60 seconds again. The most difficult version is balancing with your eyes closed for 60 seconds. Even 20 year-olds need to train for this.
If that’s still too easy you can try balancing with your eyes closed for 60 seconds and then continue with your eyes open until you reach a total of 3 – 5 minutes on one leg. Have fun!
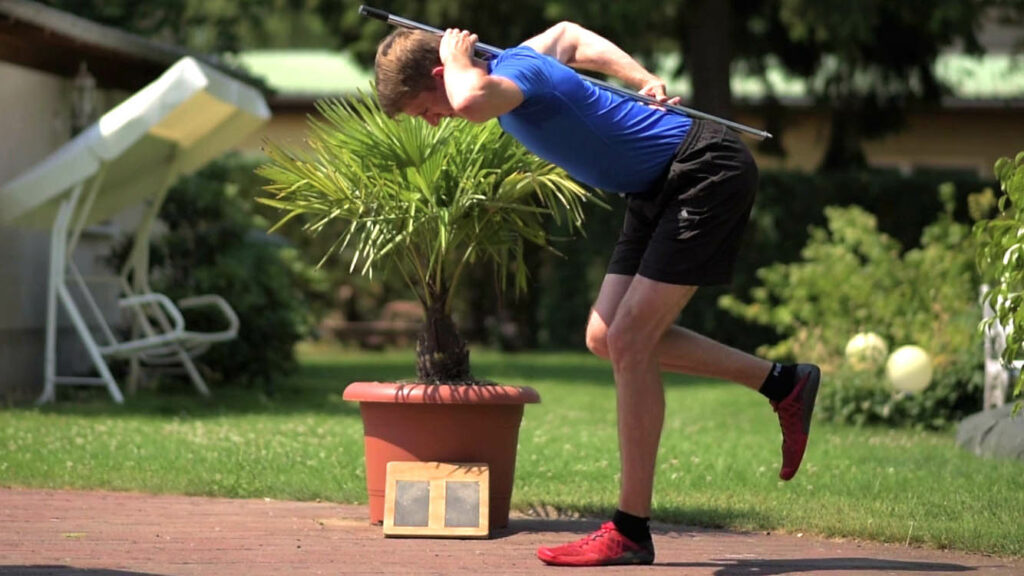
Hip Hinge Practice
With this exercise you’re protecting the knee by strengthening the hamstring muscles. Stand with your feet about hip-width apart and pointed forward. Now bend over by hinging at the hip.
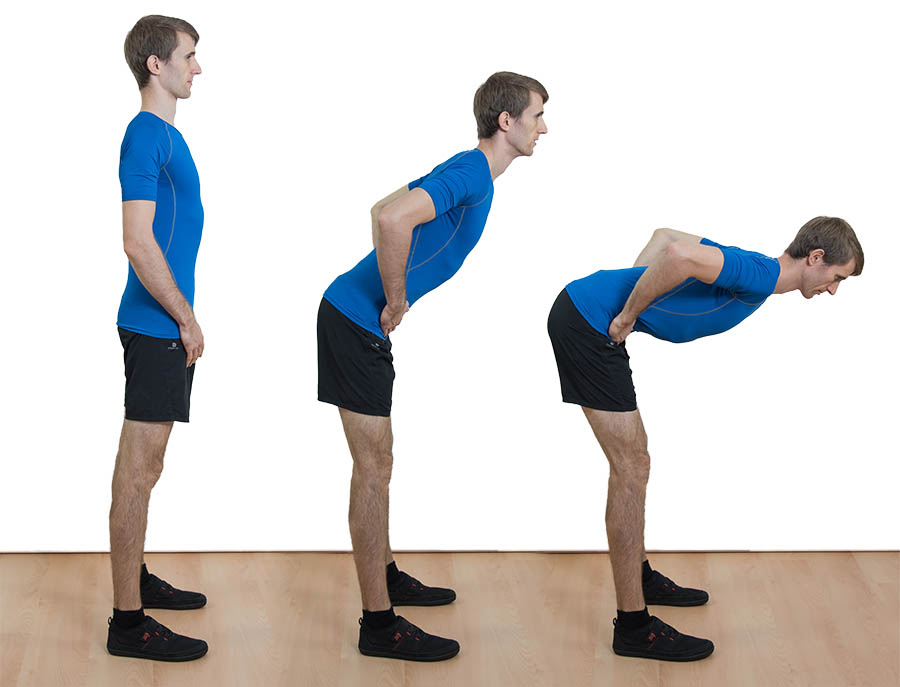
I recommend doing this exercise with a stick behind your back to learn the proper technique. You can use a broom handle or a curtain pole for example.
Keep the stick in contact with your tailbone, your upper back, and your head. There should be a small gap between the stick and the lower back (enough to slide a few fingers through).
Hinge at the hip and go as low as you can. You can bend the knees a little bit, but most of the movement should be at the hip. Once you notice that you’re losing contact with the stick you push up again by squeezing your buttocks muscles as if you’re pinching a coin.
At the top you want to squeeze the buttocks muscles particularly hard for a second. Go for 3 sets of 15 repetitions. Take as much time as you need.
Leg Press
The leg press is not an at-home exercise, but since it is such a great choice for building stronger legs as a senior I couldn’t leave it out.
The leg press is a very safe way to train the leg muscles, particularly the quads. You can start with a very low resistance and work your way up in small increments. You can also stop at any moment if it’s getting too much.

The two downsides are that you need the machine, obviously, and that you have to pay attention to your back alignment throughout the movement to prevent back issues. Specifically, you don’t want to bend your knees too much. There should always be a small gap between the lower back and the back rest.
Seated Leg Extension
The seated leg extension allows you to train your quadriceps muscles at home. Since this is an isolation exercise you can compare strength between sides and fix imbalances. The exercise works best with some ankle weights, although a resistance band will do too.
Sit on a chair with one foot on the ground. Extend the other leg in front of you until the knee is straight. Start with just your bodyweight. Once that’s easy you can begin using ankle weights or a resistance band.
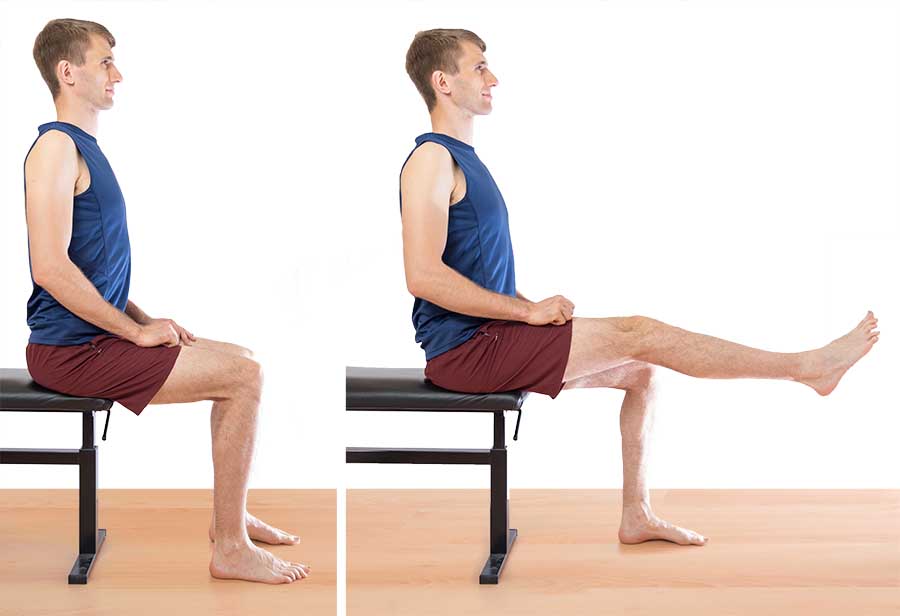
Go for 3 sets of 12 repetitions per side and move slowly. You want to control the movement. Don’t let the band or the weight jerk your leg around. If you cannot control the weight 100%, use less resistance.
Wall Sit
The wall sit is one of the simplest, but also one of the most mentally challenging knee strengthening exercises. It’s not just for seniors, but also great for knee rehab from patellar tendonitis and for building basic leg strength after a longer break from sports.
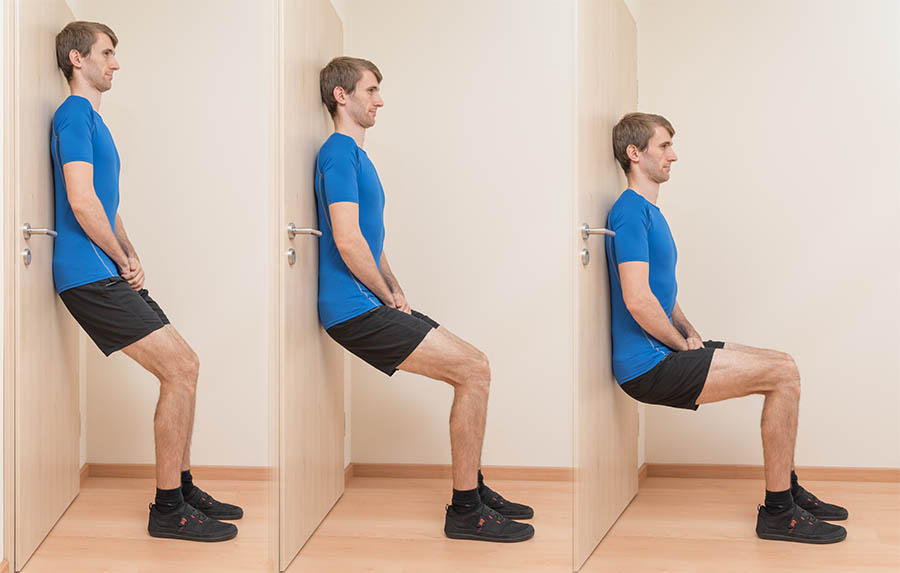
Here’s how you can adapt the wall sit to your level of strength. The higher your hip is, the easier the exercise will be. Place your hip lower on the wall to make it harder. It’s hardest with the hip at or even slightly below knee level.
Deep Squat Hold
Muscles get stiff. As do joints. To protect the knees we need to work on two joints in particular: the hips and the ankles. The deep squat hold is perfect for that. Here’s what it looks like:
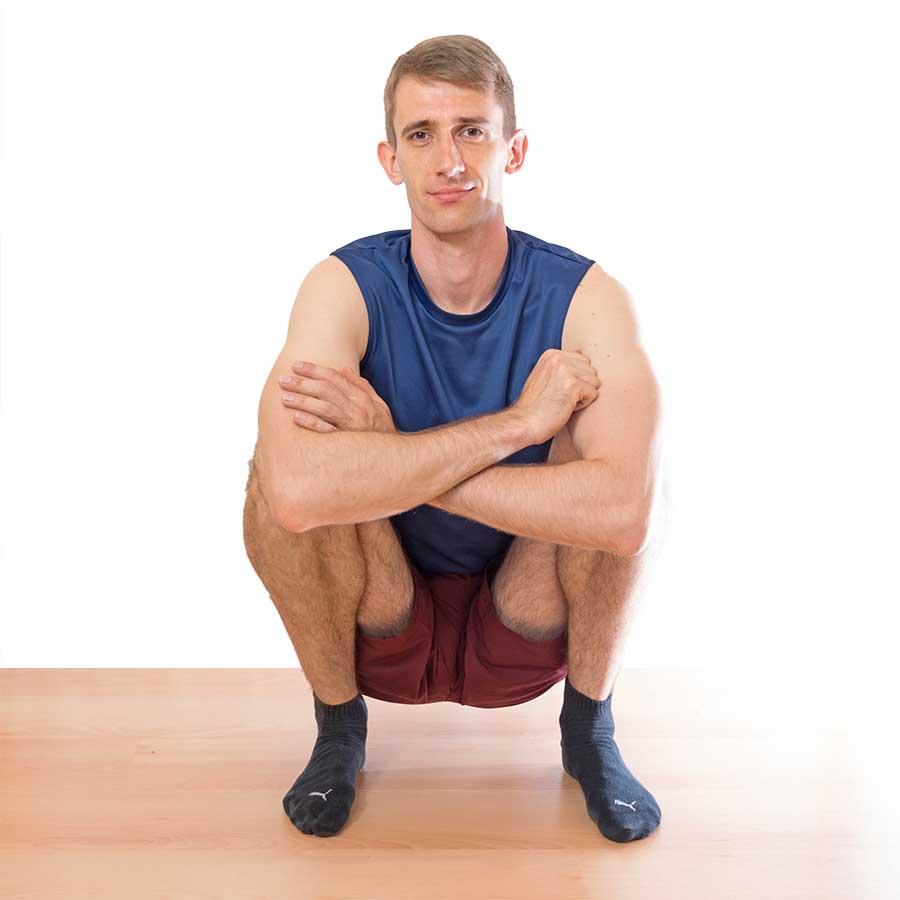
To do this knee strengthening exercise you stand with your feet hip-width apart and pointed forward. If you want to, you can go with a wider stance. Now you squat all the way down with your heels on the ground.
You can hold on to something for support if you want. There may be minor discomfort in this position initially due to the stiffness in the ankles and hips, but it shouldn’t be painful. Never exercise through pain.
Once you’re in the bottom position, recheck the alignment of your feet. They should point forward or ever so slightly to the outside.
Relax in the deep squat for about a minute. Then get out of the movement by letting your hip drop to the ground behind you. Extend your legs on the ground in front of you and get up once you’re ready.
Build up to doing 5 – 10 minute holds in this exercise. Try to move your hip around from left to right as well as forward and backward as much as you can. This mobilizes the hips and ankles further.
The deep squat hold is a great knee strengthening exercise because you can do it every day while watching TV or reading a book.
Step Up
The step up is the last knee strengthening exercise for seniors in our little list. It combines the skills we practiced in the other exercises into one movement that we all do thousands of times per year.
To do the step up you stand on a stair or a step with both feet pointed forward. Now you gently touch one heel to the step below. Keep the knee of the working leg over the mid-toes and move slowly.
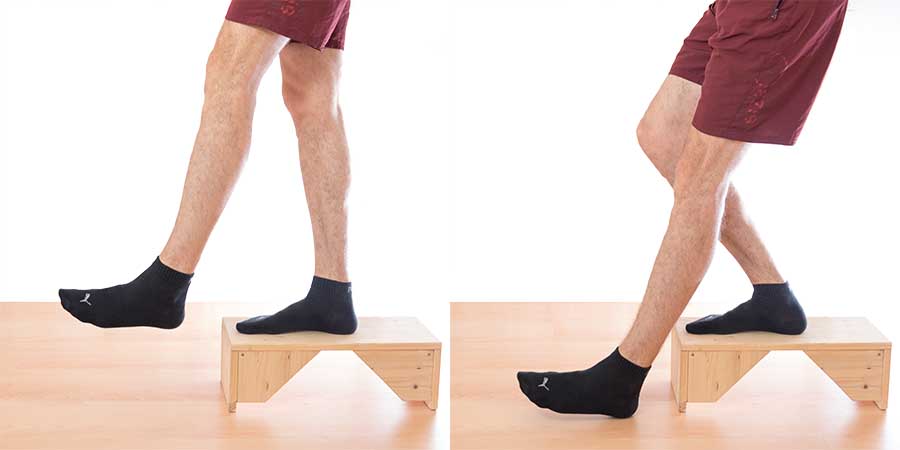
Go for 3 sets of 8 reps per side in the beginning. You can build up to 3 sets of 15 over several weeks, as your legs permit.
Example Routines to Get You Started
Here are three simple knee strengthening routines you can use to get started.
Beginner Routine
- Amosov squat for 50 – 100 reps
- Two-legged glute bridge for 3 sets of 15 reps
- Ankle rotations for 50 – 100 reps
- Hip Abductions for 3 sets of 15
- Clamshells for 3 sets of 15
Intermediate Routine
- Wall Sit for 5 sets of 1 minute
- Banded squat for 10 very slow repetitions
- Deep squat hold for 5 minutes
- Prone Leg Raises for 3 sets of 12
- Single-leg glute bridges for 3 sets of 15
Advanced Routine
- Reverse lunge for 5 sets of 8, use weight if applicable
- One-legged deadlift for 5 sets of 8, use weight if applicable
- Hip thrust with barbell or single-leg glute bridge with weight for 4 sets of 15
- Single-leg calf raises for 3 sets of 15
- Hip flexor lift, 3 sets of 12 with adequate weight
These routines are just starting points. You can adapt them to your needs and liking by replacing exercises or adding others.
If you want to learn more about how you can make your knees strong again, check out my free email course:
Finally, here’s a PDF download of all the knee strengthening exercises we talked about.
If you found this article useful, you can help me spread the word by sharing this page on social media.
