In the last two emails, I’ve shared two techniques that gave me instant relief when I was suffering from patellar tendonitis. We talked about how self-massage takes stress off your patellar tendon and how the curb stretch helps with sore knees.
Try these techniques now if you haven’t already. Both are vital for getting rid of patellar tendonitis.
Whereas the massage and the curb stretch provide relief instantly, today’s exercises are needed to prevent patellar tendonitis from coming back. Many of my readers complained that they had been suffering from patellar tendonitis for years (!) and that it always kept coming back.
Today, we cover one of the reasons why patellar tendonitis keeps coming back: the secret connections between weak hip muscles and patellar tendon overuse.
One last note before we get started: the exercises we’re going to talk about today are not meant to give you immediate relief. They’re an investment in the future and doing them will pay off over the next couple of weeks and months, not days!
One Major Reason Why Patellar Tendonitis Keeps Coming Back
During the research for my book on patellar tendonitis, I discovered several reasons why patellar tendonitis keeps coming back. Weak hip muscles are very high on that list. So today, we’re going to investigate the connections between patellar tendon overload and weak hip muscles. We’ll also talk about which exercises you can do to fix this problem.
Connection 1: Weak Hips Contribute to Higher Patellar Tendon Load
When your hip is weak, particularly the muscles on the back of your hip, your body shifts more weight to the muscles on the front of the leg.
As analogy, imagine you’re driving in an All-Wheel-Drive vehicle and for some reason the rear wheels don’t work properly. As a result, the front wheels are exposed to more stress.
In your body, this weight shift to the front of the legs will lead to your quadriceps doing most of the work when running and jumping. When the quads are working harder than necessary, the patellar tendon is also exposed to unnecessary stress.
Additionally, the weight shift to the front of the legs will lead to your quads becoming tight, which causes postural problems that weaken the hip muscles even further.
To get rid of patellar tendonitis permanently, you need to stop this vicious cycle by strengthening the hip.
Connection 2: Weak Hips Lead to Tight Hamstrings
Another reason why weak hips cause patellar tendonitis is that they eventually lead to tight hamstrings, which will force your quadriceps to work harder when extending your knee.
This connection is very similar to what we talked about in the last mail on tight calves: like your calves, the hamstrings cross the knee on the backside of the body, so if they’re tight, the quads will have to work harder to extend your knee.
It’s another tug of war, this time between the hamstrings and the quadriceps, with the patellar tendon still right in the middle, taking damage.
Here’s why a weak hip leads to tight hamstrings to begin with:
One of the tasks of the muscles on the back of your hip, the gluteal muscles, is to create hip extension:

The hamstrings and the gluteals work together to create hip extension. If the gluteals are weak, the hamstrings have to pick up the slack and work overtime. As a result, they become overworked and tight.
This secret connection is why it’s so important to strengthen the hip muscles before trying to fix tight hamstrings through stretching and why we haven’t talked about hamstring stretches yet.
If you stretch hamstrings that are tight because of weak gluteals, you won’t notice any improvements. Your hamstring tightness might even get worse!
Connection 3: Weak Hips Lead to Bad Knee Alignment
One last connection between weak hips and patellar tendonitis can be traced back to bad knee alignment. If your hip is weak, preventing your knees from caving in towards the midline of your body will become harder.

This is because the hip muscles are needed to control thigh position when moving. The weaker the hip, the higher your risk of bad knee alignment becomes and the more your knees deviate from good alignment, the more your patellar tendon will pull off axis.
It’s like opening and closing a zipper by not pulling the zipper straight up and down, but off to the side. First, it’s more difficult, meaning your muscles have to work harder. Secondly, it wears the zipper down much quicker.
This is how off-axis forces contribute to overuse of your patellar tendon and why they need to be avoided when recovering from patellar tendonitis. The most important requirement for avoiding this type of overuse is a strong hip.
3 Hip Strengthening Exercises to Stop Patellar Tendonitis from Coming Back
In the previous paragraphs, we’ve covered three reasons why a weak hip will contribute to patellar tendonitis coming back.
Now that you know why strengthening the hip is so important, it’s time we talked about how you can do that. I’ve tried a number of exercises for this purpose, but the following three have proven most effective and convenient.
Exercise #1: The Glute Bridge
Lie down on your back and place your arms at your side. Bring your heels back towards your hip so that your fingertips touch your heels. Now, lift your toes off the ground so that only your heels are touching the floor.
Next, lift your hips up as high as you can. Check your hamstrings and your glutes with your hand for tension: your glutes should be much tenser than your hamstrings.
Continue tensing your glutes in an effort to lift your hips higher and hold this position for a couple of seconds. Then come down, relax, and repeat.
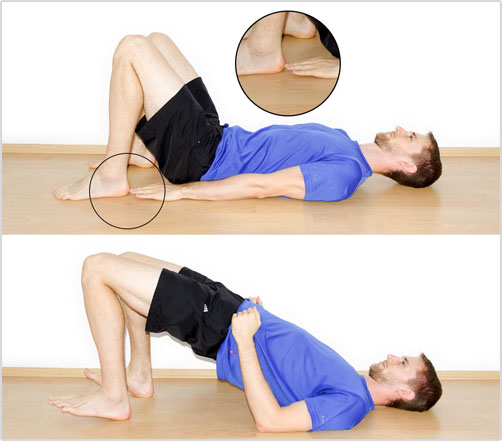
Make sure that you’re really tensing the glutes hard throughout the exercise and try to relax the hamstrings as much as possible. Touch the muscles with your hand to feel how tense they are. Don’t let your toes come down. Keep pulling your toes up as high as you can.
Exercise #2: Hip Abductions
To perform hip abductions you lie down on your side, with your body in a straight line. Now, keeping the legs straight, lift the upper leg up by moving solely from the hip. Keep the foot of the working leg pointed towards the floor or parallel to make sure you’re using the right muscle.
Lift the foot as high as you can and hold for a second. Return to the starting position. Don’t worry if you don’t have a lot range of motion in the beginning.
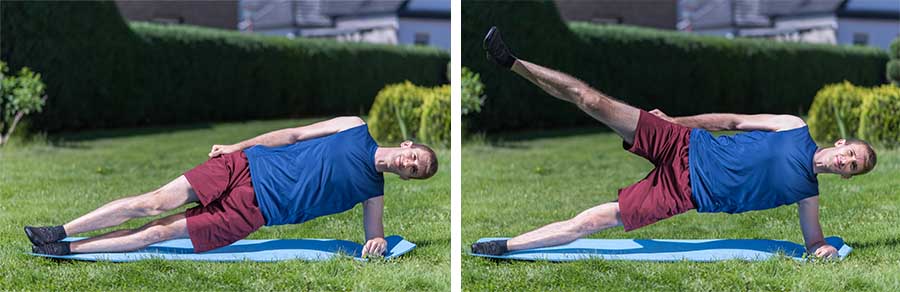
You can make this exercise harder by holding the top position for 5 seconds and contracting your hip muscles as much as possible during that time.
Again, do not let the foot of the working leg rotate outward. It must not point towards the ceiling, but should be parallel to the ground or pointing towards the ground. Have someone else watch your form if you’re not sure whether you’re doing it correctly.
Exercise #3: Clamshells
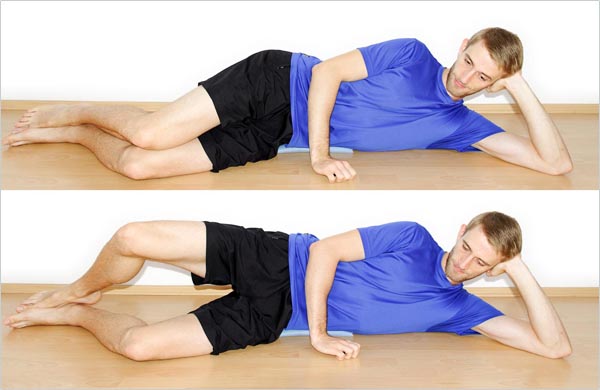
Lie down on your side and put some padding under your hip if you are on a hard surface. Bend your knees slightly and place them a bit in front of you.
Rotate the upper leg up by using your hip muscles. Keep your feet relaxed throughout and don’t push off with the toes. Keep your upper body and your hip stationary, only move the working leg. Hold the elevated position for a couple of seconds and then return to the starting position. The exertion should be felt on the side of the hip.
To make the exercise harder you can hold the top position for 5 seconds and tense the working muscles as much as possible.
Integrating These Exercises In Your Training
You should perform these exercises every other day. Go for two sets of 10 to 15 reps for each of these exercises when you don’t have any running or jumping activities on your agenda.
If your training calls for running or jumping, just do two sets of 5 for each exercise to activate the muscles (i.e., help the nervous system remember how to use them). Once the exercises become too easy, you can wrap an elastic band around your legs to make them harder.
More important than it looks
When I give people these exercises, their first reaction usually is one of doubt. These drills seem so easy and kind of goofy. Once you try them, you’ll realize that they’re actually hard in the beginning.
The harder you find these exercises, the weaker your hip is and the more you need those drills. Don’t let yourself be fooled by their goofy looks. Take them seriously and you’ll be well on your way to getting rid of patellar tendonitis.